
There will be various reasons for you wanting to import your Outlook email or other items from an Outlook File (.pst) including the below-mentioned ones:
- You have to transfer your Outlook data files from one email to your other email account
- You have to transfer your Outlook data files from one PC to your other PC
- You have to transfer your Outlook data files from your PC to your Mac or vice versa.
- You have to move your Outlook data files between an IMAP or Exchange server and your local folders.
Table of Contents
Steps to Import PST File in Microsoft Outlook 2010
Import Your Outlook Files from a PST File in Outlook for PC:
According to these instructions, we have assumed that you’ve exported your Outlook files i.e. email, calendar and contact already from another Outlook instance. So, you have to import those files to Outlook now. Here is how you can do it:
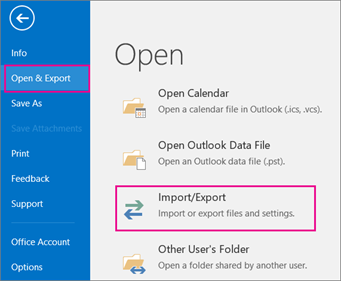
1. Select File, which you can see at the top left of your Outlook ribbon
Moreover, if your ribbon isn’t having any File option at the top in the left corner of the screen, you haven’t been utilizing the Outlook app installed on your PC.

2. Click at Open & Export > Import/Export. This will begin the Import/Export wizard.
3. Click at Import from another program or file, and now select Next.
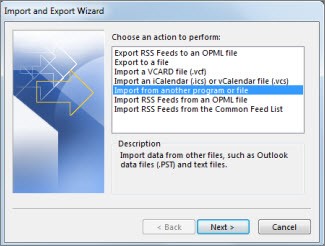
4. Click at Outlook File (.pst file) and then select Next.
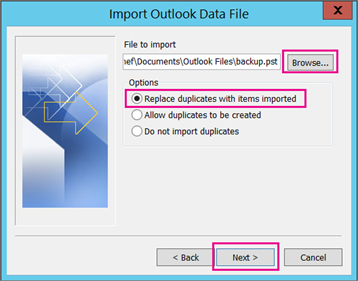
5. Browse to your PST file that you are wishing to import. Now, under Options, choose how you would like to deal with your emails as well as contacts, now go ahead select Next.
6. If a password was assigned to the Outlook Data File (.pst), enter the password, and then click OK.
7. If you’re into the process of importing the .pst file contents into the Office 365 mailbox, go ahead and make a selection of that mailbox here.
Other than that, if you’re NOT into the process of importing into your Office 365 mailbox, select Import items into the current folder. This will help you in importing the data into the folder you have selected currently.
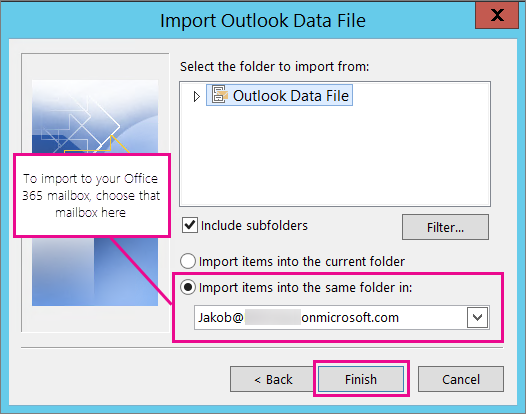
8. Now, select Finish. This will immediately make Outlook import all the content of your PST File. Moreover, your import will get finished as soon as the progress box disappears from the screen.
If you’re into the process of importing your PST file to the Office 365 mailbox, a message might appear in front of you saying that it’s in the process of connecting with Office 365. Moreover, this usually happens if your internet connection isn’t working properly or gets interrupted for a moment or more. However, your Outlook will keep on importing your PST file once the Internet connection gets re-established.
Tip: If you only wish to retrieve some of the emails and contacts from your Outlook Data File (.pst), you can open your selected Outlook File, and after that, you can drag and drop your emails and contacts in the navigation pane from PST file to your already existing Outlook folders.
What data gets imported?
PST files are usually created when you are into the process of the export or you back up email, calendar, and contacts, to the Outlook PST file. Also, Outlook ensures to make your email’s copy to the .pst file.
- While the Outlook is exporting the emails to PST file, it consists of the attachments. And hence, while you are importing a .pst file, you will be able to see your attachments.
- Meta-data, for example, message rules; folder properties (permissions, views, or Auto Archive settings); and the list of blocked senders aren’t exported by Outlook. And hence, you won’t be able to import them, either.
- While Outlook is in the process of exporting contacts, email as well as calendar data to a PST file, Outlook ensures a copy of all the information. And hence, nothing gets removed from Outlook. Moreover, you will still be able to have access to your data in order to see your contacts, calendar, and emails in Outlook.
How to Save Outlook Emails to Hard Drive? – Backup Your Emails
Have you been worried about backing up your Outlook emails lately? Have you been aiming to save your Outlook emails to a hard drive on your computer just to create a backup and you have no ideas where your Outlook has been saving your email files on your PC. Well, if this is something making you feel stressed, here we have some solution to your problem. Before we get into details, here is a bottom line of the entire article for you:
Bottom Line:
{There are 3 Methods in order to back up your Outlook emails i.e. On a regular basis you can automatically back up your Outlook emails to your external/internal hard drive, or you can export your Outlook data files (.pst) to an external hard drive, or you can save your Outlook emails manually to your hard drive. Well, all three of these ways have been discussed in detail here. So, go ahead and choose the one that suits the best when it comes to your needs.}
So, it doesn’t really matter if you have been using Outlook for business purposes or personal, but it’s crucial for almost anyone to create a backup of their Outlook emails on a regular basis to avoid any chances of data loss. And if you have been searching for a way so you can back up your Outlook emails to your hard drive, here we have three ways that work really well:
Method 1- Back up your Outlook Emails to Hard Drive Automatically
If you feel like exporting or even copying your Outlook PST/OST files one at a time is too much of time and energy wasted, you can go ahead and try the professional file backup software in order to back up your Outlook emails automatically to an internal hard drive on your personal computer or an external one. And hence, this convenient tool will help you in saving your Outlook emails anywhere.
Moreover, this tool will also help in backing up your personal data in Outlook which consists of your emails, contacts, calendars, or any other significant files just in case if you need.
Now, go ahead and download the Outlook backup software called EaseUS Todo Backup in order to back up your Outlook emails free of cost. You can also back up your Outlook emails to an external/internal hard drive with the use of the “Schedule” option regularly. Moreover, there won’t be the need for any further operations after your first full backup.
Step 1: Run EaseUS Todo Backup – Outlook backup software
Open and run your EaseUS Todo Backup software and then click the icon present at the left top corner. Now, expand the left pane and then click “Email Backup”.
Step 2: Connect to your Outlook, Select Emails as well as the Backup Destination
At first, enter the password to your Outlook and select all of the email files you have got to back up. Now, go ahead and Find a suitable location as the destination – Internal hard drive or your external hard drive in order to store the backup files.
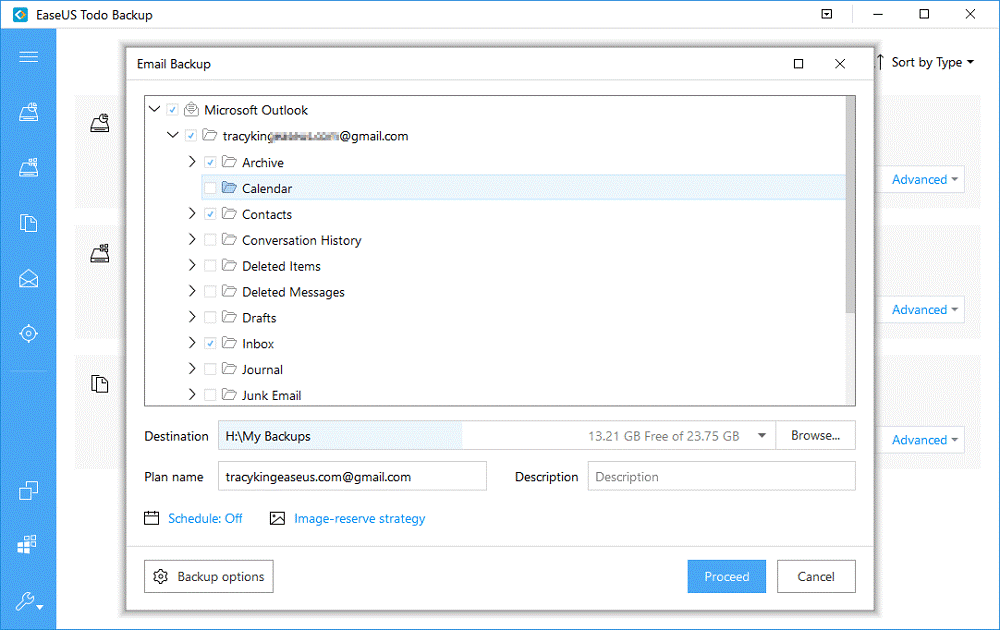
Step 3: Start the backup process
Click “Proceed” in order to start the back up of your email files.
Now, with the use of this powerful tool, you are also able to transfer your Outlook emails from one computer to your other PC. Also, this helps a lot while you are thinking of switching to a new PC. Besides, if you delete emails unintentionally in your Outlook, you are able to recover your lost Outlook emails in order to get access to your important data once again.
Method 2- Export Outlook .pst or .ost Files manually (from Outlook Email App)
Another alternative way that can be used is to export your Outlook emails from your Outlook Email app. Moreover, this method will help you in saving your PST files to a local drive or an external/internal hard drive as a backup:
Step 1: Open your Microsoft Outlook and then log in > Click “File” > “Open & Export.” After this, go ahead and click “Import/Export”.
Step 2: Now, in the Import and Export Wizard, select “Export to File” and click “Next”.
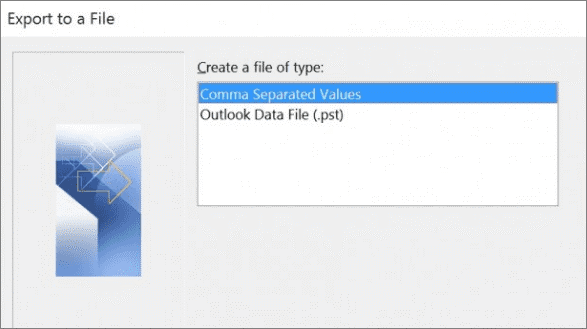
Step 3: Click Outlook Data File (.pst). Now, go ahead and click “Next” > Choose the Inbox as the folder in order to export, or simply expand Inbox and then select a preferable folder. Now, click “Next”.
Step 4: If you require backing up your Outlook to your external hard drive, then you will have to connect the external drive to your PC. After that, Click “Cancel” just in case if a dialog box pops up on the screen of your computer.
Step 5: Now, Click “Browse” and make a selection for the external drive from the storage devices list. And then go ahead and type a name for the backup file. Now, click “OK”.
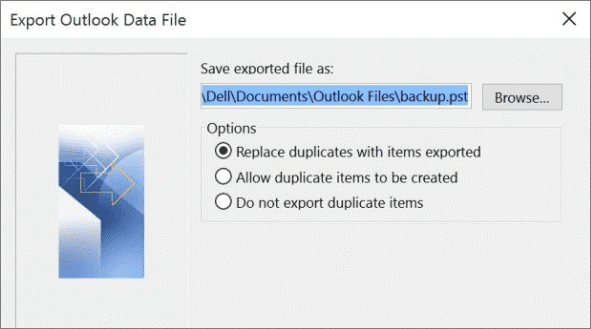
Step 6: In the end, Click “Next” > “Finish”.
In order to secure your messages, don’t forget to enter a strong password immediately. After that, click “OK”. Otherwise, just select the “Cancel” option.
Method 3- Manually Save Your Outlook Emails to a Hard Drive
If you have to search the exact location of Outlook emails on your personal computer and you want to copy to Outlook .pst and .ost files to some other hard drive manually, you can simply follow the below-mentioned steps:
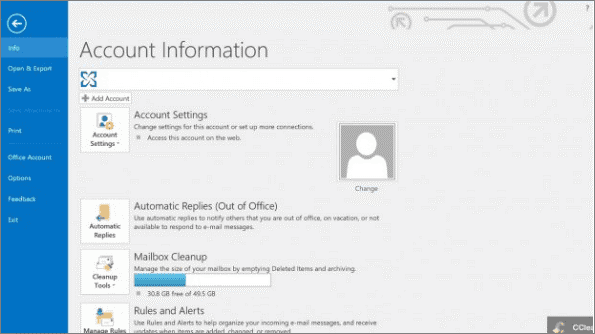
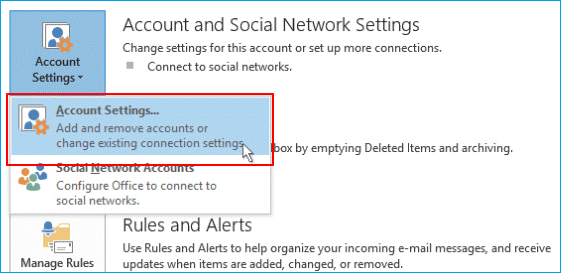
Step 1: At first, find out where your Outlook usually saves your emails: Run Microsoft Outlook and then login > click at “File” and then select “Account Settings”.
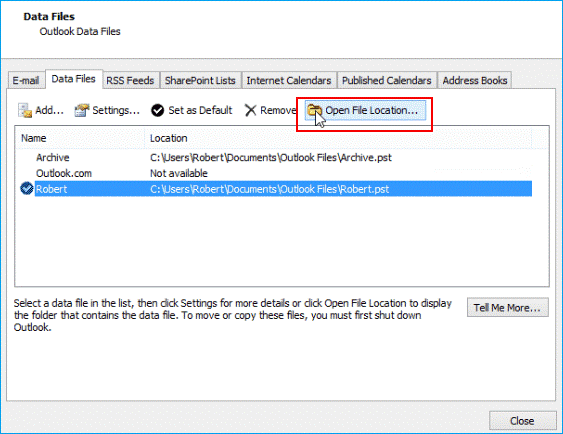
Step 2: Now, select “Data Files” and then you can check out that specific location of Outlook .pst or.ost files on your personal computer.
Step 3: If you have to open the .pst or.ost files in the Windows Explorer, go ahead and click at “Open File Location”.
Step 4: If you have to copy your Outlook .pst or.ost files to your external or internal hard drives, you will have to go through the exact steps in order to search your saved files on your computer:
- At first, Press “Win + R” in order to force open the Run dialog and then type:%APPDATA%> Click “OK”.
- Now, you have to navigate to the specific location where the Outlook stores your .ost or .pst files:
drive:\Users\ \AppData\Local\Microsoft\Outlook
drive:\Users\ \Roaming\Local\Microsoft\Outlook
drive:\Users\ \Documents\Outlook Files
drive:\Users\ \My Documents\Outlook Files
drive:\Documents and Settings\ \Local Settings\Application Data\Microsoft\Outlook
Step 5: After doing the above, you will be able to copy .ost or .pst files and you can save these files as a backup to your local drive or any of your internal or external hard drives.
Conclusion:
All of the 3 above-mentioned methods will greatly help you in the process of backing up your Outlook emails. However, each one of them has various different plus points.
When it comes to the EaseUS Todo Backup, you are able to automatically as well as regularly back up the Outlook emails to your hard drive. And hence, there are minimal chances of losing your data. In order to create a backup of your emails by exporting, you are able to complete the whole process in your Outlook app.
The best part about this is that you won’t need any help from the third-party software. However, although your Outlook emails can be saved to an external hard drive by simply copying.
And this seems to be an easy way to back up your Outlook emails but this is a little complex as well and hence, it is not much recommended to be used. So, make your choice accordingly and go for the one you would prefer the most and apply it in order to store your Outlook emails immediately to your hard drive.
How to Export Outlook emails?
Have you been looking to Export your Outlook emails to Gmail or new server or platform and you have no idea about how to get started with it? And you are also stressing over this thing that you might lose some of your important data in the process of this exchange?
Well, you don’t have to stress over this thing. Here we have got you this easy-to-follow and step-by-step guide in order to Export Your Outlook Emails the easiest and safest way. We hope that helps!