So you have to screenshot the complete screen on your Mac and you have been looking out for ways to do that. Well, you screenshot the complete screen on your Mac, a window, or mere a specified portion of the Mac screen. Also, if you are someone who has already upgraded to macOS Mojave, you will be able to utilize Shift-Command (⌘)-5 in order to capture every type of screenshots or for making video recordings of the screen.
Moreover, there are many other keyboard shortcuts, for example, Shift-Command-3 and Shift-Command-4, which keep on working in almost all macOS versions. So let’s get started with our step-by-step “how to screenshot on mac” guide:
Capture the complete Mac screen
In the case of macOS Mojave:
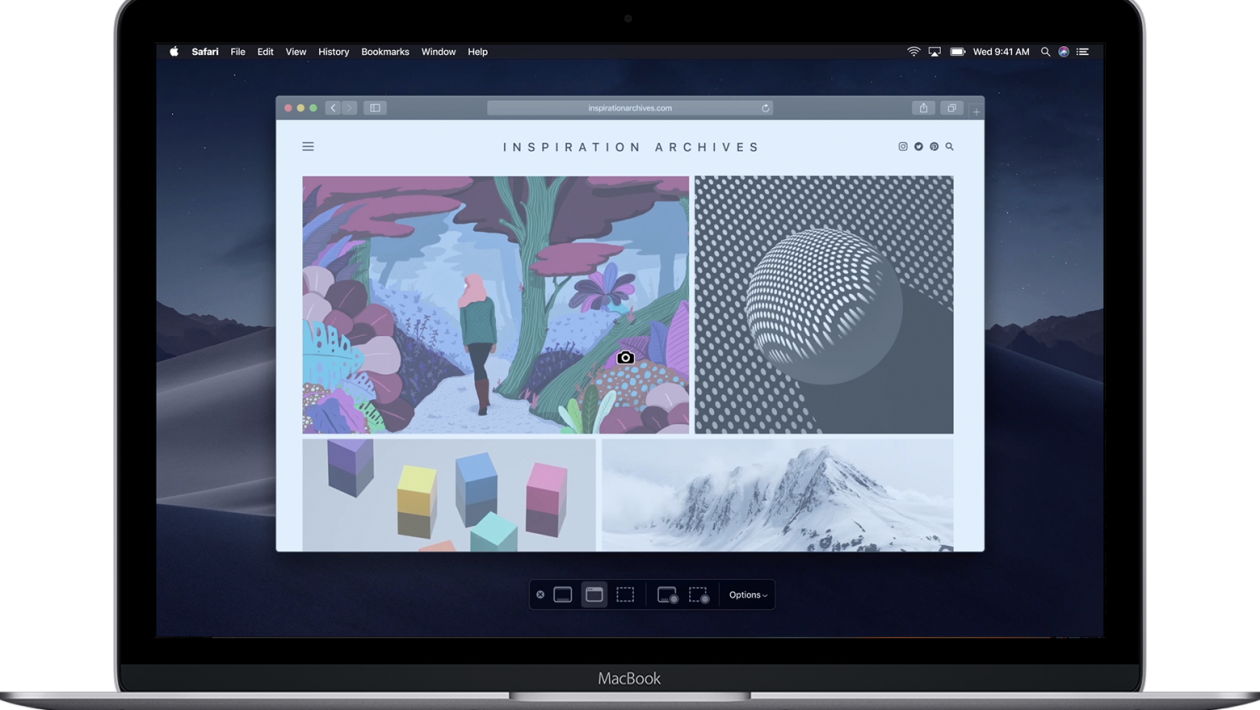
- At first, Tap Shift-Command-5 on the keyboard in order to check the capture controls onscreen:

- Now, click at Capture Entire Screen
 in the capture controls onscreen. At this point, your pointer will get changed to a camera
  .
. - Now, go ahead and click on any screen about anywhere in order to screenshot the screen of that display, or simply click Capture in the onscreen controls in order to capture every display screen.
- Here, a thumbnail of the screenshot will show up briefly right in the corner of the screen. Now, you are able to then locate the screenshot on the desktop.
In all of the macOS versions:
- At first, Tap Shift-Command-3 in order to capture the screen of each display.
- Now, you will be able to then locate the screenshot on the desktop.
How to capture a window
In the case of macOS Mojave:
- At first, Tap Shift-Command-5 in order to see the “onscreen capture controls”.
- Now, go ahead and click Capture Selected Window that you can see in the onscreen controls. At this point, your pointer will get changed to the camera
 .
. - Now, click a window in order to capture that entire window.
In order to exclude the shadow of the window from the screenshot, simply tap and hold the Option (⌥) key meanwhile you click it. - Here, a thumbnail of the screenshot will show up briefly in the corner of the screen. You will be able to interact with that thumbnail in order to edit your screenshot or to move it or in order to take various other actions that you require. Moreover, you can just wait for the screenshot for appearing on the desktop.
In the various versions of macOS:
- At first, Tap Shift-Command-4.
- Then, go ahead and tap the Space bar. Here, the pointer will get changed to a camera .
- Now, simply click a window in order to capture the window that you want.
In order to exclude the shadow of the window from the screenshot, simply tap and hold the Option (⌥) key when you click. - Now, you will be able to locate the screenshot on the desktop.
Capture a Specified Portion of Your Screen
In the case of macOS Mojave:
- At first, Tap Shift-Command-5 in order to look at the onscreen capture controls.
- Now, go ahead and click Capture Specified Portion in the onscreen controls.
- Then, drag in order to select a particular area of the screen for capturing. For moving the complete selection, simply drag from within your selection.
- Now, it’s time to click Capture in the onscreen controls.
- At this point, you will be able to locate a thumbnail of the screenshot briefly show in the corner of the screen. You will be able to interact with that thumbnail for editing the screenshot or to move it or to even perform other actions. Moreover, you can also wait for the screenshot to show up on your desktop.
In the various versions of macOS:
- Simply tap the Shift-Command-4.
- Now, drag in order to select the specified area of the screen for capturing. In order to move the complete the selection, go ahead and tap + hold Space bar while you are dragging.
- Once you have released the mouse or trackpad button, go ahead and you will be able to locate the screenshot on the desktop.
How to capture a Menu
In the case of macOS Mojave:
- At first, Tap at the menu in order to reveal the contents it has.
- Now, go ahead and Capture the menu by simply following the below-mentioned steps in order to capture the complete screen or for capturing the window (the menu is basically treated just like a window) or for capturing a specific portion of the screen which consists of the menu.
In the various versions of macOS:
- Here, click the menu in order to reveal the contents it has got.
- Simply tap Shift-Command-4.
- Drag in order to select that area that you want of the menu for capturing, then go ahead and simply release the mouse or trackpad button in order to capture that specified area.
- Or you can also press the Space bar so that you are able to change the pointer to the camera , then go ahead and click the menu for capturing it.
- Now, you will be able to locate the screenshot on the desktop.
Capture the Touch Bar
- If you are someone who owns a Mac that has a Touch Bar and macOS Sierra 10.12.2 or later, simply go ahead and tap Shift-Command-6 in order to capture what is displayed at the current moment on the Touch Bar. At this point, you will be able to locate the screenshot on the desktop.
- You may also go for customizing the Control Strip region of the Touch Bar that you have in order to include a Screenshot button.
Utilize the Screenshot Thumbnail
While you get a screenshot on your macOS Mojave, you will be able to locate a thumbnail of the screenshot which will show up briefly in the lower-right corner of the screen.
- Don’t take any action or swipe the thumbnail to the right: The screenshot that you will take will automatically get saved to the selected location where you would want to, which is the desktop by default in most of the cases.
- You may Control-click the thumbnail in order to go for more actions, for example, you may want to modify the default save location or need opening the screenshot using a particular app or to just delete the screenshot, not storing it at all.
- Now, here you can drag the thumbnail in order to move the screenshot to some other location that you prefer, for example, an email, to a document, a Finder window, the Trash or other.
- Simply click the thumbnail in order to open the screenshot. You may also then utilize the markup tools in the toolbar to do various things like to crop, annotate, rotate or to take other various required editing actions. Moreover, you can press the share button in order to share your screenshot.

In the end, if you still aren’t wanting the thumbnail to show up, go ahead and click at “Options” in the onscreen controls, and then utilize the option called ”Show Floating Thumbnail” in order to change the entire setting as per your needs.
How Screenshot on Mac Not Working? Solution
According to an Apple Discussion, a user stated, “The shortcuts for the screenshot on my MacBook Pro are not working. I hear the camera shutter sound but they are not appearing on my desktop and when I search for any images created today on my Mac, they are not there. Does anyone know how to fix this?”
Well, if we talk theoretically, to take a screenshot on Mac is quite easy especially when there is not any matter running. However, when it comes to the users, many have reported saying that they have met this issue of “the Mac screenshot not working” as we have said previously without any particular reason. So how can one fix this problem timely and also continue with a screenshot on Mac? Well, below are a few effective tips for the same.
4 Tips to Fix “Screenshot not working on Mac” Issue Effectively
Most of the users have located the command shift 4 to be not operating on their Mac’s while they had to capture a screenshot of a specified area and no camera shutter or no image that has been stored on Mac. So no need to worry, you can fix it by following the methods we have given below.
1. Restart your Mac
Not restarting your Mac for a long time may become the cause of some applications to be not working well. So how what you should be doing next? Well, you will be able to restart your Mac with the use of three ways we have mentioned below:
- At first, tap the Power button (or simply tap “Control + Eject“) and then, on the appearance of a dialog box, go ahead and click the “Restart” button and voila.
- Here, you will be able to choose the “Apple key” and then, you can simply click “Restart“.
- It’s now time to tap “Control + Command + Eject” (or simply tap “Control + Command + Power” button)
2. Check the screenshot shortcuts
In order to capture a complete screen’s screenshot, you can simply use the shortcuts “Command + Shift + 3”. Also, you may also use “Command + Shift + 4” in order to capture a specified region unless you have got the shortcuts activated.
Move to “System Preferences” > “Keyboard & Mouse” > “Keyboard Shortcuts” > check whether the shortcuts have been activated or not below Screen Shots. Moreover, make sure to run a check on if they have been assigned or not to something else.
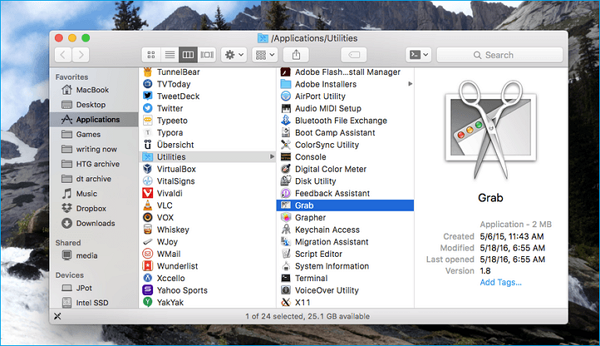
3. Utilize Grab for taking a screenshot on Mac
In the case, if the above-mentioned two solutions don’t work or can’t fix “Mac screenshot not working” issue, and also, you have to get it done it in a hurry, then you may use the “pre-installed Grab on Mac” in order to take a screenshot of a specific area or section from the entire screen or an individual window or even the complete screen.
Move to “Applications” > “Utilities” > find and open “Grab” > “Capture” > choose in order to capture a particular screenshot depending on your own requirements.
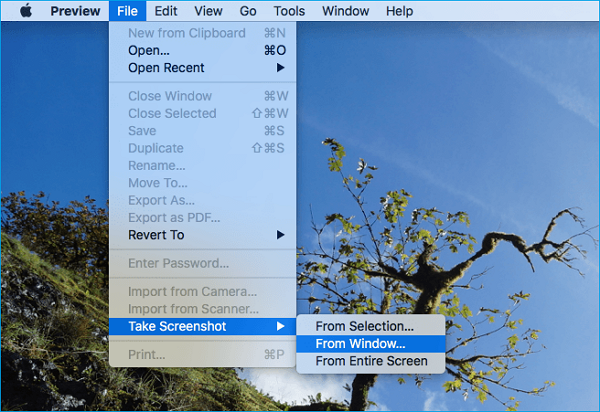
4. Take a screenshot with the use of Preview
A preview is basically a tool by default which allows you to open as well as edit your images. Moreover, you are able to also capture a screenshot by just clicking at the toolbox icon.
Move to “Preview” > click “File” > select “Take Screenshot” that you can see at the resulting drop-down menu.
How to transfer the screenshot from Mac to iPhone?
Once you have got yourself a screenshot successfully on Mac, you would definitely require syncing your images to the iPhone that you own. Do you agree with this? So how will you be able to do it with ease?
Well, you can do it with the use of AirDrop which is utilized to transfer screenshot from Mac to an iPhone or you may use AirDrop photos from your iPhone to your Mac. In order to do the same, simply turn on AirDrop as well as the Bluetooth Wi-Fi connection on iPhone along with your Mac, and then, go to your Photos application on the Mac.
Once you are done with the previous steps, go ahead and make a selection in order to share the particular screenshot with your iPhone with the use of AirDrop.
How to transfer a screenshot from Mac to your iPhone?
How can you transfer a screenshot from your Mac to an iPhone in a very convenient or efficient manner without any cost involved in it? Well, we have a solution for you right here. You can do the same with the use of EaseUS MobiMover Free in order to sync photos from your Mac to an iPhone very easily.
Apart from that, if you require downloading some of your favorite and interesting TV shows as well as a few movies or if you just want to add some ringtones from your Mac to your iPhone, you can utilize MobiMover Free in order to fulfill all your requirements very easily.
 |  |
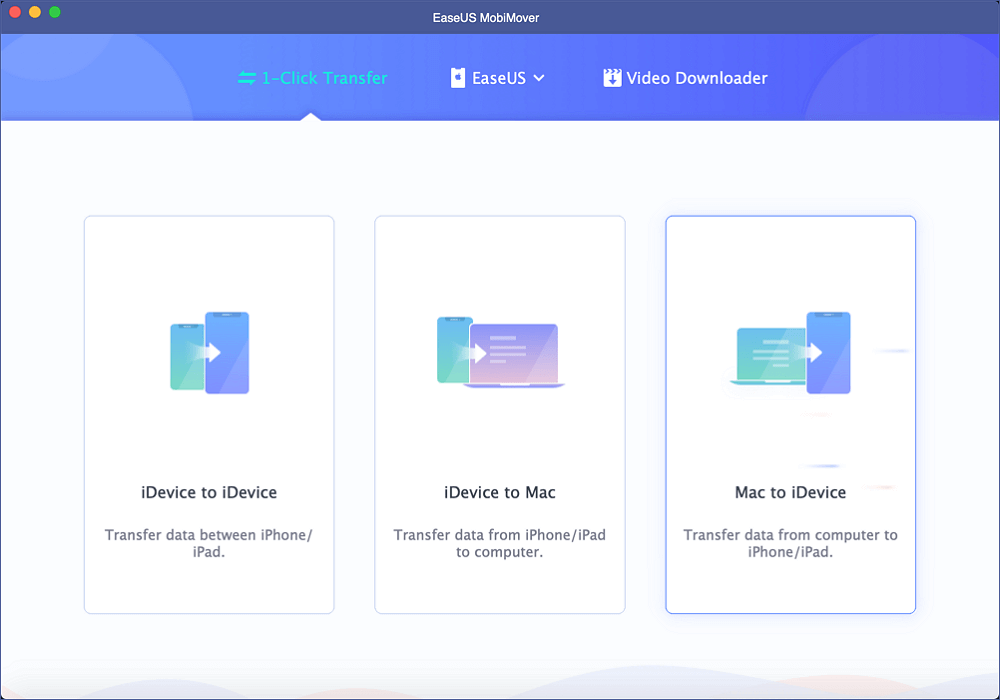
Step 1: At first, you have to connect your iPhone to the Mac by running OS X 10.7 and after that, simply run EaseUS MobiMover Free, and then you have to select “Mac to iDevice“.
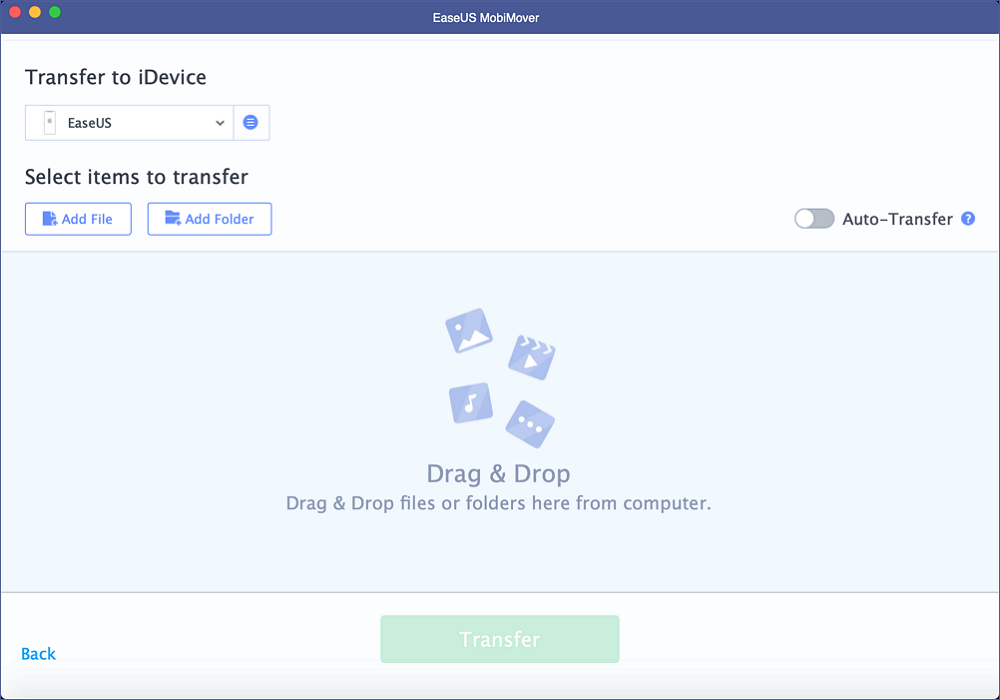
Step 2: In a new window, simply click “Add File“/”Add Folder” in order to select files which have to be transferred from your Mac to the iPhone. Moreover, you may also just add files with the use of drag and drop.
Note: All of your photos will get transferred instantly if you have got the “auto-transfer” mode on. Moreover, you are able to turn it off in the case if you don’t require it.
Step 3: Now, you have to make sure to run a check on the category/categories. Moreover, you are also able to keep them all, or you may just keep “Pictures“.
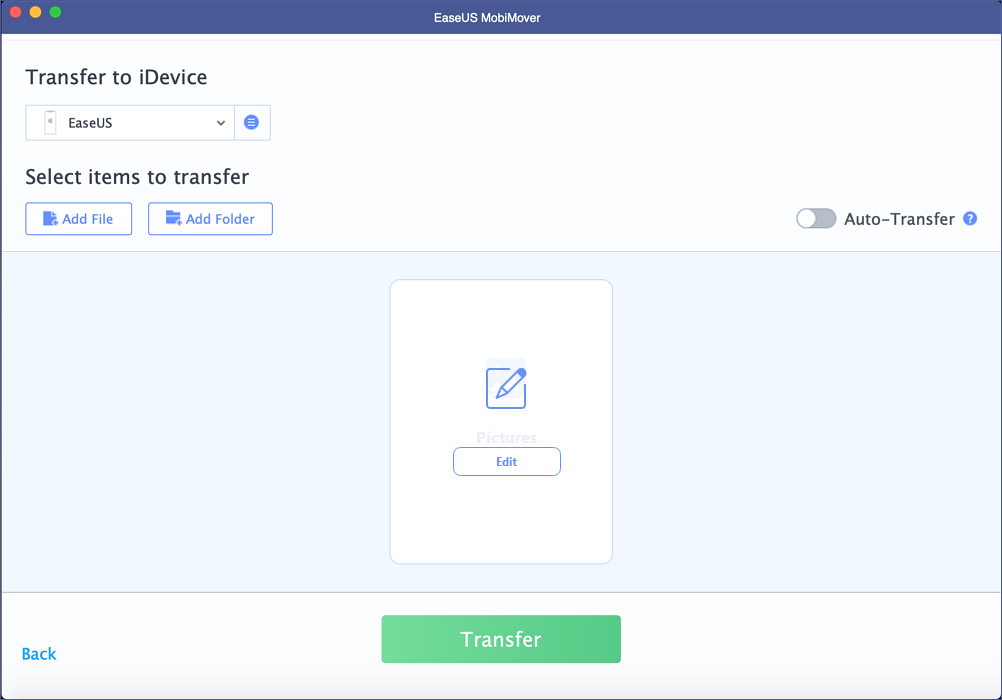
Step 4: Now, just go ahead and click the button that says “Edit” in order to deselect the files that you don’t really require for now. Then, go ahead click “OK” in order to go on.
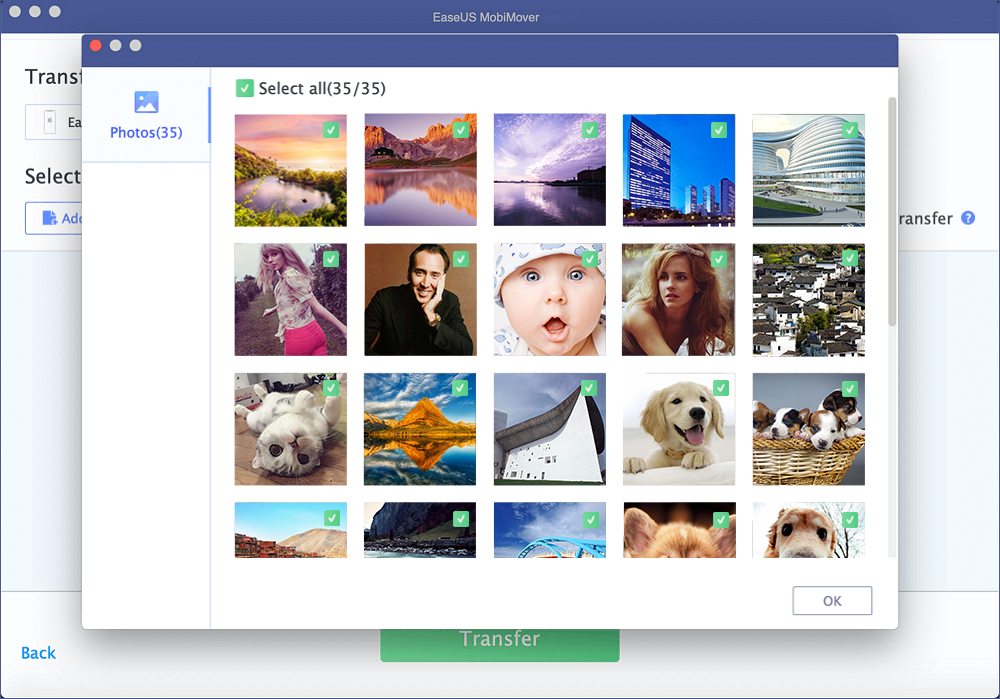
Step 5: At this point, you have to Click “Transfer” and have to wait for the complete transfer to get done patiently. After this is done, you may go to your Photos app on the iPhone in order to view your photos that have been newly imported.

So we hope these above-mentioned steps and process have helped you solve any issues related to taking a screenshot on Mac. In the case, if you have been looking out for anything else related, make sure to contact us for the same.